 |
| Go to the Google 3D Warehouse and download the pack and get started! |
So, you've heard that you can use Google Sketchup for designing buildings in Minecraft using my Block Pack, but have no idea how to do any of that? Well, get downloading, because you've come to the right place.
First, let me explain what Sketchup is, then I'll get to explaining how to use various tools, and how they relate to your model designing buildings for Minecraft.
- Introduction To Sketchup (& Setup)
- Looking around, Orbit, Pan, and Zoom
- Instructor and Windows
- Move Tool
- Scene Tabs - Customizing Your Views and Saving Your Cameras
- Section Cuts - See What's Really Going On
- What Sketchup Calls Identical Blocks - Components
- Blocks in Your Model
- The Rest of the World's Components
- Using Components
- Sharing Your Model with the World
Introduction to Sketchup
Sketchup is a three dimensional modeling engine that is known as a "What You See Is What You Get" (WYSIWYG) renderer. This is because what you see on the screen is what will be turned out when you "render," or in Sketchup's case, export an image. Sketchup is developed by Google, and there exist a ton of tutorials, forums, and support groups just for using it - so this tutorial will try to cover the use of Sketchup as it applies specifically to Minecraft.
It is a great starter program to 3d modeling (I wish I had it to start learning on!) because the learning curve is very shallow, and it should be simple to pick up. Don't be deceived though, it can be an incredibly powerful modeling tool, and is used by professionals and amateurs worldwide.
Setup
Setup is pretty easy, download and follow the instructions, then open it up. It'll ask what template you want to use - select whichever you want but I use the architectural/engineering plan views at the bottom since they don't include a 2d figure, which means less work for me starting a new document (No deleting of useless figures). Keep in mind that you can change the template later if you want, and you can look it up in the Sketchup documentation. As for equipment, Sketchup works on most modern machines, and you'll have a much, much easier time if you use a three button (Right, Left, and Scroll-Click-Wheel) mouse (though you can still work with 1 or 2 buttons, the scroll wheel is used for all navigation and your workflow will be slower without it).
Looking Around
In Sketchup (and in most 3d modeling programs), there are 3 basic ways you can manipulate the model on your screen. These are Orbit, Pan, and Zoom.
This is the first view in the file I've made. All the manipulations to the view will be able to be made in sequence as I present them here.

Orbit: The orbit tool is typically used by clicking the Middle-Mouse-Button (Scroll Wheel), and dragging the mouse in any direction. This will Orbit the view around, or rotate it without changing the distance/focus from the object, and it will attempt to orbit around whatever object is at the point you clicked. In other words, if you use the orbit tool and click on the stone block, the tool will attempt to orbit around that block.
An interesting side note, in Sketchup, the orbit tool will also attempt to keep your vertical (Blue, Z in most modeling programs, Y in Minecraft) axis vertical on the screen. If you want to defeat that mechanism, hold "Control" while using the tool.
If you don't have a 3-button mouse, clicking on the orbit tool and clicking and holding the left button will preform the same function.
 |
| The orbit tool rotates and flips the view as if you were balancing on a pole attached to the object |
Pan: The Pan tool is used in the same way as the orbit tool, but with one change - hold shift. This will Pan the view - move it toward the sides of the screen.
The control for a 1 or 2 button mouse is the same as the orbit tool (Only click the pan tool instead of the orbit tool).
 |
| The Pan tool moves the view as if you were side-stepping |
Zoom: The zoom tool is used by scrolling the wheel in and out. It will let you focus in on any object to see more detail or get do more fine work on an object. The zoom tool works in a similar way to the orbit tool - it will focus on an object you are hovering over when you zoom. The important part of this is that the zoom tool will move proportionate to the distance between you and the object you are zooming into - that is, if you're focused on a block near the camera and you zoom over background, you will probably shoot past the object you are intending to zoom into!
For a 1 or 2-button mouse, click the tool and then hold the mouse button while moveing the mouse in any direction - though left/down will move it out and up/right will move it in (pretty sure, if not go the other way).
 |
| The zoom tool moves you closer to the object you are working on, as if you walked toward it |
Instructor and Windows
Windows: Starting from the top, you have your title bar (Typical on all machines windows) with the name of the file, the name of the program, and the minimize/restore/close buttons. Then the menu bar with the standard "File" and "Edit" (which do what you'd expect), "View" which has the toolbars for if you want to change the way your Sketchup looks, and then "Camera" (Tools involving the view, zoom, perspective/parallel projection - you see in Perspective in real life, but parallel projection is useful for making plan views - and zoom extents, or 'zoom out to the entire model'), "Draw" (Draw tools- line, arc, circle, rectangle, etc.), "Tools" (some special modification tools - erase, scale, rotate, move, etc.), "Window" (we'll be talking about that - but all of the different windows that I'll pull up will be in there - component, materials, instructor, which we will discuss and styles, scenes, and etc. that we won't be talking about), and lastly "Help" - a window that has info for you to if you get lost/confused.
 |
| The "Window" Menu - this is how you get the Instructor if you've lost it. It's also where you get Preferences, Model Info, the Outliner (A list of objects in your model), and other menus. |
The Instructor: The instructor window is great for first-time users. It shows you an animation of the uses of
the tool you've selected, gives you operation guides, and a list of any modifiers and special features of the tool I really recommend reading it's advice if this is your first time using Sketchup.
 |
| The Instructor is a great resource for first-time Sketchup users! |
Materials: This is important because it is where you get all of the colors and textures to make your model really have depth, and not just be a collection of blocks or random lines and faces. All of the materials in my file are labeled by "ID#_Name," excepting the first 9, which are labeled "_ID#_Name" because otherwise they wouldn't sort properly. Unfortunately, now they're at the end of the list...

Move Tool
The move tool is probably your most important asset for working on Minecraft models. It allows you to move blocks around, copy them to new locations, and array them in lines and grids. An array, in this case, is a set of objects a certain, predetermined, distance apart.

Using the Move tool is pretty easy - select it and click on a block. It will highlight the block and move it around, wherever your mouse goes, the block will go. It is important to note the different things that Sketchup tries to lock, or snap, to - the axis's, edges, points, faces, the origin, and other guides. You can force Sketchup to try to keep your block snapped to the guide by holding shift when that guide's tool tip pops up (Those little pop-up notes by your mouse's pointer? Those are tool tips), or you can force Sketchup to use the axis's by hitting one of the arrow keys until it locks to your desired axis. Up is the blue axis, and right/left are the red/green.
You can also use the tool by having blocks selected and then using the move tool, which is a more precise way to do things.
Now, you can see that we've moved the cobble block out of the arrangement, but we probably want to keep it in place for future reference. So what I've done in this next picture is hit "control" while moving the block. That will turn the move tool into a copy-move tool, and leave the original block where it was. This is also the beginning of the method for making an array.

The second part of making an array (beside moving a block to a location that we actually want it) is typing "X" and any number (keep it low at first, 100+ can bog the machine down). Here it looks like I've hit "X5" ....

And here is the result after hitting "Enter." I now have a line of 6 blocks, the 5 copies and the 1 original. This works for dividing too ("/ #"), but I can't think of a good use for that in MC since you usually want to keep the numbers to whole meters, and don't have situations where you don't know the distance between blocks but do know the number of blocks and the endpoints (what the divide command is useful for).

This array tool can be done with any number of blocks, in any distance and direction. You can move the blocks diagonally to their corners and it will make a diagonal line. You can skip a block and it will make a dashed line of blocks. You could copy that line of 6 blocks over to the right, and it would make a platform. In short, you can build just about anything in MC with this one tool and one modifier key.
Scene Tabs
Scene tabs are Sketchup's way of saving cameras - if you set up a view you really like and want to save it, the only way is to set up a scene. If you've opened the component I created (as opposed to download it straight into Sketchup), you'll notice that you have 2 scene tabs already - "Working" and "Basic Render."

In this view, you can see that I'm still using the "working" tab (I'll explain that mysterious tower that just happened to appear in the section on Components). The background is white, there are lines, and other than textures, there's nothing fancy going on. This is to conserve processor power and make it easier for me to work; with each new viewing thing Sketchup has to add, it takes more processing time and resources and will run the model slower. Since I'm not too concerned about looks when I'm working, I use a view that doesn't strain my machine too much and get stuff done. You can make it run even faster by turning off textures (hidden line and shading work well), but since I'm using the textures to figure out what blocks I'm using, I left them on.

This is the view when you click on the "Basic Render" tab - though your camera's position might be somewhat different. As you can see, ground and sky are turned on, shadows are on, and lines are off. I've also hidden the geometry (blocks) I don't want to show up. Hidden geometry is still there, it's just invisible. In fact, it will still interact with your other geometry (if you're drawing lines and rectangles and stuff), so you've got to make sure you make your geometry groups and components if you're making any (If you're using the blocks, they are already components and won't interact with anything, so don't worry about that).

Sometimes you'll want to change your scene (typically to move the camera), and the way to do that is by clicking on the scene you wish to change in the scenes window (I've clicked on the "working" scene above), then clicking on the update button (next to the "+" for add scene, it looks like arrows chasing each other).

Doing that brings up this window. If you only want to update the camera, unselect all the other options and click update. Your scenes can store any or all of that information the same way, by unclicking the options. If you want a scene that doesn't store the camera, for example, you could uncheck the "camera" button and leave the other options set. Creating new scenes and deleting scenes work the same way - click the "-" to remove a scene and the "+" to make a new one.
You can use scenes to create animations as well, but I'm not going to go into that since the goal here is to design models and then build them, and recording from Minecraft is much better for animating than trying to use Sketchup.
Section Cuts
Section cuts are a way to slice through your model to see what is inside - it does show the inside of blocks, but since there's nothing in there, that doesn't give you any more information that what you had. They will allow you to edit blocks within a shell easily, however, and thus I'm including them in this tutorial.

You can access the section cut by going to Tools/Section Plane in the menu bar.

Once you've done that, your pointer will turn into a section plane, which you can place on any object. I recommend placing it on either a flat face or on a vertical face, since you probably won't need any other directions. This will place the cut, as seen above, with dark lines outlining blocks that have been cut through. It will allow you to see inside the model, and make adjustments as necessary.

You can click on the section cut itself and move it if you need to, and you can right-click on it and there are options to "Flip Cut" and "Align View." Flip does exactly what it sounds like - flip the cut to face the other way. Align view moves your camera to face dead-on to the section plane. This is also the only way to specifically position a camera within Sketchup; you can of course move the camera with the navigation tools, but to place a camera in a set location you must use a section plane.
Components
Components are the lifeblood of Sketchup. The blocks are made of components. What are components? Well, let me explain.
To understand components, you first need to understand Groups. Groups are a selection of geometry that is combined together to make an object. In Sketchup, groups cannot interact with other geometry, which is great because when we try to move them they don't get stuck. Sketchup stores similar groups as one object, and so when it draws the model on your screen, it only has to know the position of the group, and what is in the group, not where every line, face, and other bit of information is. A component is identical to a group with one key difference - it is always the same as any same-component (A group can be changed and other groups will not change, a component cannot be changed without changing other components).
Let's open up the component window and get started:

Here I've opened the component window (Window/Components), and it's pretty empty, this is because it defaults to a folder with nothing in it. Click on the house icon to go to components in the model.
Components in Your Model:
So having clicked on the home button, this is what you'll see:

These are all of the components used in the model. This is where your components will go when/if you make any. For now, all the blocks are stored here, and if you accidentally lose any or delete any you can get them back from this menu.
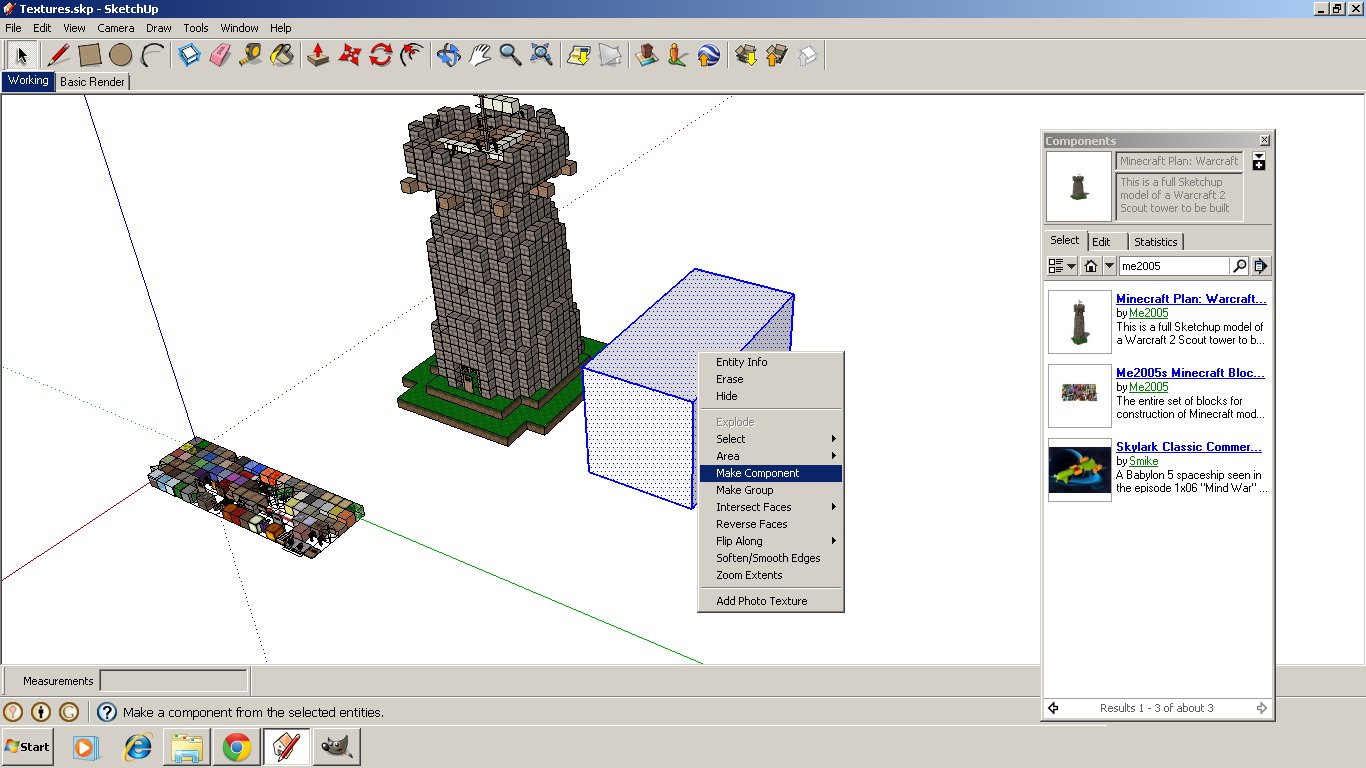
The Rest of The World's Components: The great thing about Sketchup is that Google has created an excellent resource called the 3D Warehouse. It has models created by millions of users across the world; whatever they felt like sharing is up there and you can really find models for just about anything. You can access it by typing something into that search bar at the top of the component browser...
Oh look, I searched for Me2005 and found a plan for a minecraft tower, the block-set we're already using, and some totally unrelated thing. Click on the picture of the tower.

Sketchup will ask if you want to load the component directly into your model, and if you say yes, it'll start downloading it directly into your already-open file.


Once your model has downloaded, it will appear attached to your pointer. place it somewhere and you can use it in your model! Keep in mind though, any model not created by you will post back to the 3d Warehouse as contributed to by the creator of that model. That's usually a good thing though, so don't worry about it too much.
Using Components: As I've already explained, Components are the lifeblood of Sketchup, so knowing how they work and how to make them is important.
First, right click on the tower and explode it. this will make it no longer a part of the original component, and this is mostly so that it is easier to navegate. It would make it so that any other copies of this component will not change, but this particular component is made up of components in a sick, twisted, never-ending loop. So changing most things in the tower will change other copies of the tower despite that it's no longer a component.
You should notice something important though, and that's the "Make Unique" option. If you have more than one component in a model, you can use this option to make a unique copy of the original, so changes to it won't effect all of the copies in the model. I usually use this when I've got a similar component to make, like the doorway in this tower, and I've already finished the other components that I'm copying it off of (the tower's walls).

Clicking on the tower and on the walls, you'll notice things graying out. that is because Sketchup grays out the similar objects in the model and the rest of the model to make it easy to work on. You can change the settings for this in Window/Model Info.

Notice how moving one block moves the blocks in the same position on all the other sides of the tower- I rotated the components to achieve this, but it will always work the same way.
Here's another example: Make a recangle, and pull it up with the push-pull tool. Right click it and click "Make Component."
This window will come up, and let you name the component and give it a description. Make sure the check box saying "Replace selction with Component" is checked before clicking create.

This will create a new component for you to play with. Click it and move-copy it over a few times.


Double-click on the component to open it, and use the push-pull tool to push the face in and out. Notice how the other 3 components change with it. You can use this on any set of objects, geometry, components, or whatever you're using. This is really beneficial for making buildings, as it is pretty standard to make similar or identical portions on parts of anything. It also helps with organization, since you can keep roof blocks in one group or component, and wall blocks in another group or component and change them without having to select them all again.

Sharing Your Model with the World: Now that you've got your model all made, you probably want to share it with the world, right? Well, here's how:
Once you're happy with your view, you've saved the file, and everything is finished, you can share the model with the world on the 3d Warehouse. Click File/3d Warehouse/Share Model... to get started.

It will ask if you want to purge unused items from the model. This takes all materials, components, and other bits you are not using and removes them (permenently!) from the model to decrease it's size. You decide what's best for you, I usually do it but I usually know what I'm removing. If you're not sure, save as and upload a copy.

This window will pop up, giving you the options to log in (You'll need a Google account), name the model, and add a description and a website. (If you learned how to do this from this site, I'd really appreciate the props in either your description or URL ; ). You can also add tags, or search terms, to your model to make it show up when someone searches for it, and make it public or private. Once you click upload, it'll send the file and be on the 3d Warehouse immediately. Currently, you can't change an uploaded model, but you can delete it and re-upload.

*Phew*
That was quite the tutorial, I hope you liked it and will use it to make some awesome stuff! Thanks for reading!
No comments:
Post a Comment